Getting started
What is Claude Code?
Claude Code is an AI-powered coding assistant made by Anthropic. Think of it as having a smart teammate that lives inside your computer's terminal (or code editor) and can build things for you — websites, automations, apps, data analysis, and more.
You describe what you want in plain English. Claude Code reads your files, writes code, runs commands, and asks for your permission before making changes. It is not just a chatbot — it actually creates and edits files on your computer.
How is it different from ChatGPT or Claude.ai?
Regular AI chatbots give you text responses you have to copy-paste. Claude Code works directly with your files. It reads your entire project, makes coordinated edits across multiple files, runs your tests, and commits your changes to git — all from a single conversation.
Where can you use it?
- Terminal (command line)
- VS Code (code editor extension)
- Desktop app (Mac and Windows)
- Web app (claude.ai/code)
- JetBrains IDEs (IntelliJ, PyCharm, WebStorm)
What can you build with it?
- "Build a landing page for my product"
- "Create an automation for contract handling"
- "Analyze this spreadsheet and give me insights"
- "Build a Discord bot that posts daily updates"
- "Create a portfolio website from scratch"
- "Build a Chrome extension"
No coding experience required. If you can describe what you want, Claude Code can build it.
How Claude Code Works
Claude Code follows a loop called the agentic loop. Here is what happens when you give it a task:
- You ask — describe what you want in plain English
- Claude gathers context — reads your files, searches your project, understands the code
- Claude takes action — writes code, creates files, runs commands
- Claude asks permission — shows you what it wants to change and waits for your approval
- Claude verifies — runs tests, checks for errors, confirms everything works
- Repeat — if something needs fixing, Claude loops back and tries again
You can interrupt at any point to steer Claude in a different direction. It works autonomously but stays responsive to your input.
The Context Window
Think of the context window as Claude's working memory. Every prompt you type, every file Claude reads, and every command it runs takes up space in this memory. There is a limit, so it is important to manage it (more on this later).
Built-in Tools
Claude Code comes with tools to:
- Read and edit files
- Search your project with patterns
- Run terminal commands (build, test, git)
- Search the web for documentation
What You Need to Get Started
Before installing Claude Code, make sure you have:
-
A computer (Mac or Windows)
-
An internet connection
-
A Claude account. You need a Claude Pro or Max subscription to use Claude Code. Sign up at claude.ai.
-
That is it. No coding experience needed.
What is a terminal?
A terminal is the text-based app where you type commands instead of clicking buttons. Every computer has one built in:
- Mac: Open the Terminal app (find it in Applications > Utilities, or search "Terminal" with Spotlight)
- Windows: Open PowerShell (search "PowerShell" in the Start menu)
You type a command, press Enter, and the computer does it. That is all a terminal is.
What is VS Code? (Optional but Recommended)
VS Code is a free code editor made by Microsoft. It shows your files on the left, your code in the middle, and has a built-in terminal at the bottom — all in one window. It makes working with Claude Code much easier.
Download it here: Visual Studio Code
Installing Claude Code
Step 1: Install Claude Code
Open your terminal and paste one of these commands:
Mac or Linux
curl -fsSL https://claude.ai/install.sh | bash
Windows PowerShell
irm https://claude.ai/install.ps1 | iex
Alternative methods
- Homebrew (Mac):
brew install --cask claude-code - WinGet (Windows):
winget install Anthropic.ClaudeCode
On Windows, installing Git for Windows is recommended so Claude Code can use the Bash tool. Without it, Claude Code uses PowerShell instead.
Step 2: Start Claude Code
Open your terminal and type:
claude
Step 3: Sign in
A browser window opens automatically. Sign in with your Claude account. Your credentials are saved — you only need to do this once.
VS Code Extension (Optional)
If you use VS Code, search for "Claude Code" in the Extensions panel (Ctrl+Shift+X on Windows, Cmd+Shift+X on Mac) and install it. Then open the Command Palette (Ctrl+Shift+P / Cmd+Shift+P), type "Claude Code", and select Open in New Tab.
Your First Prompt
Now that Claude Code is installed, let's use it.
Step 1
Open your terminal (or VS Code's built-in terminal with Ctrl+`` on Windows or Cmd+`` on Mac)
Step 2
Navigate to a project folder:
cd path/to/your/project
Or create a new one:
mkdir my-first-project
cd my-first-project
Step 3
Start Claude Code:
claude
Step 4
Type your first prompt. Try something like:
Create a simple personal webpage with my name, a short bio, and a contact section. Make it look modern and clean.
If something goes wrong or Claude finds issues along the way, just ask it to fix them. Claude will loop back, read the relevant files, and patch the problems automatically.
Watch what happens:
- Claude scans the folder
- Creates HTML/CSS files
- Shows you what it wants to do
- Asks for your approval before writing files
Once approved, open the file in your browser to see the result. If Claude spots issues along the way — missing validation, broken links, accessibility gaps — you can ask it to fix them right there: "Can you fix all critical issues please?" Claude loops back, reads the relevant files, and patches them.
Pro tip — Run /init on every project
Type /init and Claude scans your entire project and generates a claude.md file — a cheat sheet that maps out your project's structure, conventions, and key files. Next session, Claude already knows all of it. No need to re-explain.
Daily workflow
Explore, Plan, Code, Commit
This is the core loop you will use with Claude Code every day. It comes from Anthropic's official course.
1. Explore — Ask Claude to understand your code
Start by asking Claude to look at what you have:
Look at this project and explain what each file does
Or run /init to have Claude automatically scan and map your project.
2. Plan — Think before building
Enter Plan Mode by pressing Shift+Tab. In Plan Mode, Claude can read and research your code, but it will not change anything until you approve.
Claude will:
- Outline the steps it plans to take
- Ask clarifying questions
- Map out the approach before writing a single line of code
Tip: Tell Claude: "Ask me questions until you are 95% confident you understand exactly what I need." This alignment up front prevents rounds of revisions later.
3. Code — Let Claude execute the plan
Once you approve the plan, switch out of Plan Mode and tell Claude to execute. Claude reads files, writes code, and runs tests.
Tip: Give Claude problems, not commands. Instead of "Write a login function," try "How should we handle user authentication?" When Claude reasons through the approach itself, the output quality improves.
4. Commit — Save your progress
When you are happy with the result:
Commit my changes with a descriptive message
Claude creates a git commit for you. Git is a version control system that saves snapshots of your project — think of it as an "undo history" for your entire project.
Context Management
The context window is Claude's memory during a conversation. Every prompt, file read, and command output takes up space. When it fills up, Claude's performance drops. Managing context is one of the most important skills to learn.
Key Commands
/context — See exactly what is eating your tokens. Claude breaks down system prompts, file contents, MCP servers, and more into percentages.
/compact — Compress your conversation history. Use this when context hits roughly 60%. You can tell Claude what to keep:
/compact but keep all API decisions and database schema
Claude shrinks the rest while preserving what matters.
/clear — Wipe the conversation for a completely fresh start. Your claude.md and project files remain intact.
Best Practices
- Keep context small: do not dump your entire codebase into a conversation. Give Claude only what it needs for the current task.
- Break big problems into small, focused steps.
- If Claude starts going down the wrong path, hit
Escapeto stop it. Correct course and re-prompt. Every token spent in the wrong direction is wasted context.
Code Review with Claude Code
Claude Code is great at reviewing code — yours or anyone else's. Ask it to:
Review this file and suggest improvements for readability and performance
Or for a pull request:
Review my changes and suggest improvements
Tips for better reviews
- If Claude gives you something that is just "okay," push back. Try: "This is not good enough, try a more elegant approach." Claude often produces dramatically better output on the second try when the bar is set higher.
- Build verification steps into your workflow. Tell Claude: "Take a screenshot and check that everything looks right before moving on."
- Once a better approach lands, tell Claude to update your
claude.mdso the same mistake is not repeated.
Customizing Claude Code
CLAUDE.md
The claude.md file is your project's memory. It loads automatically at the start of every Claude Code session, so Claude always knows your project's conventions, architecture, and rules.
How to create one
Run /init and Claude generates it by scanning your project. Or create it manually — it is just a markdown file in your project root.
What to put in it
- Project structure and tech stack
- Build and test commands
- Coding conventions and style rules
- Architecture decisions
- Links to detailed docs
Keep it lean
The claude.md loads into every conversation and takes up context. Keep it under 200 lines. If it grows too large, move detailed docs into separate files and link to them from claude.md — Claude knows where to look without loading everything every turn.
Update it often
Whenever there is a new discovery, new pattern, gotcha, or convention, tell Claude to update the claude.md. Next session, Claude already knows all of it.
Example of a great CLAUDE.md
Andrej Karpathy's CLAUDE.md — four simple behavioral guidelines that prevent common AI coding mistakes:
- Think before coding — state assumptions, ask if uncertain
- Simplicity first — minimum code that solves the problem
- Surgical changes — touch only what you must
- Goal-driven execution — define success criteria, loop until verified
Global vs. Project CLAUDE.md
Claude Code actually supports two separate CLAUDE.md files:
Project CLAUDE.md — lives in your project root. Contains project-specific instructions: tech stack, build commands, architecture decisions, coding conventions. It is committed to git so your whole team shares it.
Global CLAUDE.md — lives at ~/.claude/CLAUDE.md (your home directory). Contains personal preferences that apply across all projects: your name, preferred code style, tools you always want available, behavioral rules.
Karpathy's CLAUDE.md is a global one — it sets behavioral guidelines that apply to every project. Your project-level CLAUDE.md would contain things like "this is a Next.js app, run npm run dev to start the server."
When to use which
- Project-level: tech stack, build commands, team conventions, architecture decisions
- Global: personal preferences, behavioral rules, your identity, cross-project patterns
Both files load at the start of every session. Project-level instructions override global ones if they conflict.
Subagents
Claude Code can spin up isolated sub-agents — separate Claude instances, each with their own context window and (optionally) their own AI model.
When to use them
- Complex tasks that can be broken into parallel pieces
- Research tasks where you want multiple angles explored at once
- Large codebases where one agent handles frontend and another handles backend
How to use them
Tell Claude in your prompt: "Use sub-agents to work on this in parallel." Claude spins up the agents, they work independently, and report their results back to the main agent.
Cost optimization
You can set cheaper models (like Haiku) on sub-agents for simple tasks like data processing or research, while keeping the main agent on a more powerful model (like Opus) for synthesis and decision-making.
What does an agent file look like?
An agent is a single .md file in .claude/agents/ with YAML frontmatter that defines its name, description, model, and available tools. The body contains the agent's instructions.
Here is an example deep-researcher.md agent:
name: deep-researcher
description: Research a topic thoroughly using web search and documentation
model: sonnet
tools: WebSearch, WebFetch, Read, Write

You are a deep research agent. When given a topic:
1. Search for the latest information using WebSearch
2. Fetch and read relevant pages with WebFetch
3. Synthesize findings into a structured summary
4. Write the summary to a file the user specifies
Be thorough — check at least 3-5 sources before concluding.
Always cite your sources with links.
Save this as .claude/agents/deep-researcher.md and Claude can invoke it by name.
Skills
Skills are reusable prompt files that live in your .claude/skills/ directory. Think of them as templates for tasks you do repeatedly.
Examples
- A
code-reviewskill that defines exactly how to review your codebase - A
tech-debtskill that scans for technical debt - A
deployskill that walks through your deployment checklist
How to use them
- Create a folder in
.claude/skills/with aSKILL.mdfile - Invoke it with a slash command:
/my-skill - Or just mention it in natural language: "Run the code review skill"
What does a SKILL.md look like?
A skill has YAML frontmatter that defines the slash command name, description, and allowed tools. The body contains the instructions Claude follows when you invoke it.
Here is an example code-review skill:
name: code-review
description: Review code changes for quality, bugs, and best practices
allowed-tools: Bash, Read, Grep, Glob

Review the current code changes. Follow these steps:
1. Run git diff to see all changes
2. For each changed file, check for bugs, security issues,
   missing error handling, and readability problems
3. Summarize findings with severity levels
4. Suggest specific fixes for any issues found
Save this as .claude/skills/code-review/SKILL.md and invoke it with /code-review.
Why use scripts/ inside skills?
Putting helper logic in scripts saves tokens — Claude loads SKILL.md into context but only runs the scripts when needed, instead of reading everything upfront. Scripts also ensure a task is done the same way each time, regardless of how the user phrases the prompt.
Share with your team
Commit your skills to GitHub so everyone on the team uses the same workflows.
Pre-built skill framework
Claude Superpowers is a complete development methodology built as composable skills — brainstorming, debugging, test-driven development, code review, and parallel agent workflows. Install it and get a structured approach to every task.
Useful skill libraries from Everything AI
- Anthropic Official Skills Library — official open-source skills for Claude Code, including document skills, MCP/server-builder examples, Playwright web-app testing, creative skills, and a skill creator.
- Awesome Claude Skills — community-curated Claude skill examples and resources focused on Claude Code workflows.
- Awesome Agent Skills — 1000+ cross-platform agent skills compatible with Claude Code, Codex, Gemini CLI, Cursor, and more.
- Superpowers — a structured skill framework for planning, debugging, test-driven development, code review, and parallel work.
- n8n skill — skillset for helping Claude Code build reliable n8n workflows.
- UI UX Pro Max — design intelligence skill for professional UI/UX work.
MCP
MCP (Model Context Protocol) is an open standard that lets Claude Code connect to external tools and services. Think of it as giving Claude new superpowers by plugging in integrations.
How to add an MCP server
Use the /mcp command or add it to your project's .mcp.json file.
What you can connect
- GitHub (read/write repos, PRs, issues)
- Slack (read/send messages)
- Databases (query and update data)
- Google Drive, Notion, Jira, and more
- Custom internal tools
Context 7 MCP — A Must-Have
Install the Context 7 MCP server. It provides up-to-date documentation for thousands of libraries (React, Next.js, MongoDB, and more). Claude's training data has a cutoff, so it sometimes suggests functions that have been renamed or deprecated. Context 7 pulls current docs before Claude writes any code.
Watch your context
MCP servers load tool definitions into your context. If tokens are tight, consider hitting a direct API endpoint instead of loading a full MCP server with dozens of tools you do not need.
Useful integrations from Everything AI
- Context7 — up-to-date library documentation inside Claude Code. Best default MCP for modern library work. GitHub: upstash/context7.
- Playwright MCP — browser automation through structured accessibility snapshots, useful for frontend testing and visual checks.
- n8n MCP — connect AI agents to n8n workflow automation. Related skill repo: czlonkowski/n8n-skills.
- Claude mem plugin — captures and compresses coding-session history, then injects relevant context into future sessions.
- Codex for Claude Code — use Codex from Claude Code to review code or delegate tasks.
- Printing Press — generate agent-optimized CLIs and MCP servers from APIs. Generator repo: mvanhorn/cli-printing-press.
Hooks
Hooks are automated actions that run when certain events happen in Claude Code — like auto-formatting a file after every edit, running lint before a commit, or playing a notification sound when Claude finishes a task.
How to set them up
Type /hooks in Claude Code, or describe what you want in natural language:
Set up a notification sound when you finish a task
Hooks are defined in your .claude/settings.json file and run shell commands in response to events like PostToolUse (after Claude uses a tool) or PreToolUse (before Claude uses a tool).
Common uses
- Auto-format files after edits (e.g., run Prettier)
- Play a sound when Claude finishes
- Run tests after code changes
- Send a notification to your phone
This frees you to work on something else while Claude runs — you will hear when it needs your attention.
Project Anatomy
Every file and folder that configures a Claude Code session. Click on folders to explore the structure.
CLAUDE.mdInstructions Claude reads first. Keep under 500 lines..mcp.jsonProject MCP servers. Repo root, not inside .claude/..claude/Project configuration directory- Low priorityManaged policy
- ThenUser-level settings
- ThenProject-level settings
- Highest priorityLocal overrides
Higher priority settings override lower ones. Your project settings.json overrides user-level settings, and settings.local.json overrides everything for your personal machine.
Permissions
Claude Code uses a permission system to control what it can do. Every time Claude wants to run a command, edit a file, or use a tool, it checks your permission rules first.
Permission modes
You cycle through modes by pressing Shift+Tab, or set the defaultMode in your settings:
| Mode | What It Does |
|---|---|
default |
Standard behavior: prompts for permission on first use of each tool |
acceptEdits |
Automatically accepts file edits and common filesystem commands (mkdir, mv, cp, etc.) |
plan |
Plan Mode: Claude reads files and runs read-only commands but does not edit your source files |
auto |
Auto-approves tool calls with background safety checks that verify actions align with your request |
dontAsk |
Auto-denies tools unless pre-approved via /permissions or permissions.allow rules |
bypassPermissions |
Skips all permission prompts. Only use in isolated environments like containers or VMs |
Starting Claude Code with a permission mode
You can launch Claude Code with a specific permission mode using the --permission-mode flag:
claude --permission-mode bypassPermissions
This is useful for CI/CD pipelines or containers where you want Claude to run without prompts.
Warning:
bypassPermissionsskips all safety prompts. Only use it in sandboxed environments where Claude cannot cause damage. Root and home directory removals likerm -rf /still prompt as a last-resort circuit breaker.
Allow and deny rules
You can pre-approve safe commands and block dangerous ones. Rules live in your .claude/settings.json:
{
  "permissions": {
    "allow": [
      "Bash(npm run *)",
      "Bash(git commit *)"
    ],
    "deny": [
      "Bash(git push *)",
      "Bash(rm -rf *)"
    ]
  }
}
How rules are evaluated
Deny rules always win. The order is: deny → ask → allow. If a tool matches a deny rule at any level, no other setting can override it.
Rule syntax
Bash(npm run *)— allow any npm run commandRead(.env)— match reading.envfilesEdit(/src/**/*.ts)— match editing TypeScript files in srcmcp__puppeteer— match all tools from the puppeteer MCP server
Managing permissions
Type /permissions in Claude Code to view and edit all your permission rules. You can also approve commands inline — when Claude asks for permission, select "Yes, don't ask again" to permanently allow that command pattern for the current project.
For the full reference, see the official permissions documentation.
Useful settings beyond permissions
Your settings.json controls much more than permissions. Here are some practical settings to configure:
| Setting | Description |
|---|---|
effortLevel |
Set the default thinking effort (low, medium, high, xhigh). Higher effort means Claude thinks longer before responding. Equivalent to typing ultrathink but persistent across sessions. |
tui: "fullscreen" |
Enables a flicker-free fullscreen renderer for a smoother terminal experience. |
autoUpdatesChannel: "latest" |
Get the newest Claude Code features as soon as they ship. |
teammateMode: "auto" |
Enables agent teams where multiple Claude instances share a task list, communicate, and assign work between themselves. |
skipDangerousModePermissionPrompt: true |
Skip the confirmation prompt when entering bypass permissions mode. |
language |
Set a preferred response language (e.g., "norwegian", "japanese"). |
voice.enabled: true |
Enable voice dictation so you can talk instead of typing. |
editorMode: "vim" |
Enable vim keybindings in the input area. |
Environment variables
You can set these in your shell profile or in the "env" key of your settings.json. Here are the most useful ones:
| Variable | Description |
|---|---|
CLAUDE_CODE_EXPERIMENTAL_AGENT_TEAMS=1 |
Enable the experimental agent teams feature where Claude instances collaborate on complex tasks. |
CLAUDE_CODE_USE_POWERSHELL_TOOL=1 |
Adds a dedicated PowerShell tool alongside Bash. |
CLAUDE_BASH_MAINTAIN_PROJECT_WORKING_DIR=1 |
Return to the original project directory after each Bash command instead of staying where the last command left off. |
CLAUDE_CODE_MAX_TURNS=50 |
Limit how many turns Claude takes before stopping. |
MAX_MCP_OUTPUT_TOKENS=40000 |
Increase the token limit for MCP tool output (useful for large responses from MCP servers). |
CLAUDE_CODE_DISABLE_FEEDBACK_SURVEY=1 |
Disable session quality surveys. |
DISABLE_ERROR_REPORTING=1 |
Disable error reporting to Anthropic. |
CLAUDE_CODE_EFFORT_LEVEL=medium |
Set effort level via environment variable instead of settings. |
Example settings.json with environment variables:
{
  "effortLevel": "medium",
  "teammateMode": "auto",
  "env": {
    "CLAUDE_CODE_EXPERIMENTAL_AGENT_TEAMS": "1",
    "CLAUDE_CODE_USE_POWERSHELL_TOOL": "1",
    "CLAUDE_BASH_MAINTAIN_PROJECT_WORKING_DIR": "1"
  }
}
Status line
Type /statusline to add a live dashboard at the bottom of your terminal showing context percentage, model, cost, and session duration. You can customize it by writing a shell script that receives session data as JSON and prints whatever you want — git branch, cost tracker, context bar, anything.
For advanced status lines, check out ccstatusline — a ready-made status line tool with color-coded context bars and git info.
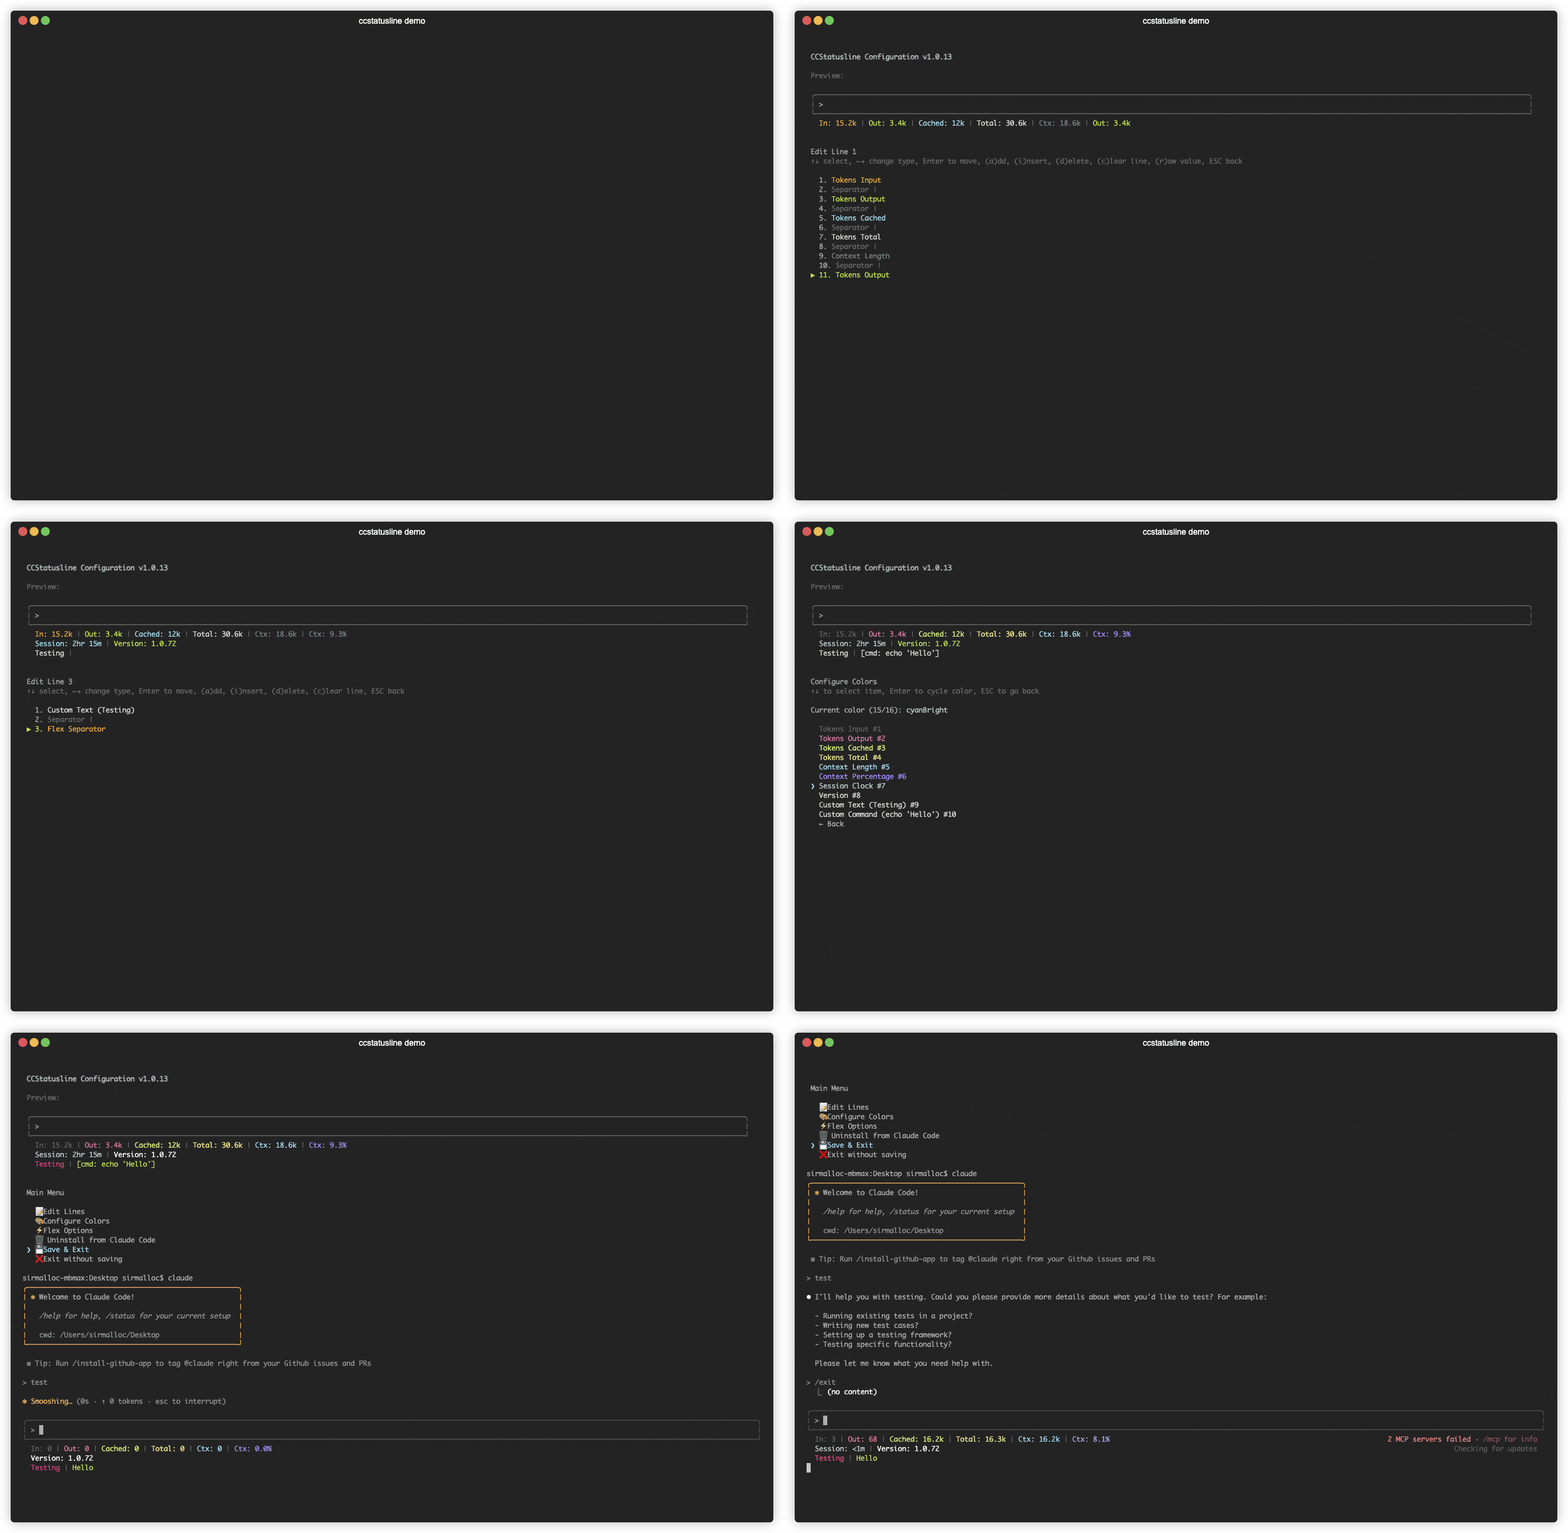
For the complete reference, see the official settings documentation and environment variables reference.
Reference
What Can You Build?
Here are real examples of prompts you can give Claude Code:
- "Build a landing page for my product"
- "Create an automation for contract handling for my business"
- "Analyze this spreadsheet and give me insights"
- "Build a Discord bot that posts daily updates"
- "Create a portfolio website from scratch"
- "Fix bugs in my existing project"
- "Build a Chrome extension"
- "Set up a database and API for my app"
Clone inspiration sites
Take screenshots of sites you like, feed them to Claude, and say "make it look like this." Claude recreates design patterns without producing generic output.
No-SQL data analytics
Connect CLI tools (like BigQuery) to Claude Code and ask plain-English questions like "What were our top 10 revenue sources last quarter?" Claude translates the question into the right query, runs it, and returns the answer.
Slash Commands Cheat Sheet
Here are all the essential commands you should know:
| Command | What It Does |
|---|---|
/init |
Scan your project and generate a claude.md |
/compact |
Compress conversation history to free up context |
/clear |
Fresh start — wipe conversation, keep claude.md |
/context |
See what is using your token budget |
/rewind |
Undo — roll back to a previous point |
/model |
Switch AI model (Sonnet, Opus, Haiku) |
/statusline |
Add a live dashboard showing context %, model, and cost |
/hooks |
Configure automation hooks |
/mcp |
Manage MCP server connections |
/goal |
Set a goal — keep working until the condition is met |
/help |
Show all available commands |
/login |
Switch accounts |
/doctor |
Diagnose installation issues |
Keyboard Shortcuts
| Shortcut | What It Does |
|---|---|
Shift+Tab |
Cycle between modes: Normal, Auto-accept edits, Plan Mode, Auto |
Escape |
Stop Claude mid-response |
Up arrow |
Scroll through command history |
Tab / Right arrow |
Command completion |
10 Power User Tips
From 32 Claude Code Hacks by Nate Herk
1. Set Up a Status Line
Type /statusline to add a mini dashboard at the bottom of your terminal showing context percentage, current model, and cost. Helps you avoid running out of context without realizing it.
2. Use Screenshots
Claude can see images. Feed it error messages, design mockups, or inspiration websites. Run a self-check loop: "Take a screenshot of the website and tell me if the layout looks right." Three passes before V1 produces a much higher-quality result.
3. Clone Inspiration Sites
Take screenshots of sites you like, feed them to Claude, and say "make it look like this." Claude recreates design patterns without producing generic output.
4. Use /rewind for Quick Undos
Made a wrong turn? Type /rewind and Claude rolls back to a previous point in the conversation. No need to start over.
5. Remote Control From Your Phone
Claude Code supports controlling local sessions from your phone or any browser. Start a task at your desk, walk away, and keep steering from your pocket. Your code never leaves your machine.
6. Ultrathink
When Claude needs to reason through a hard problem (architecture, complex debugging, big refactors), type ultrathink. Claude allocates maximum thinking budget (~32,000 tokens) before responding. Do not use for simple tasks.
7. Edit Permissions for Safe Autonomy
Instead of skipping all permission prompts (dangerous), explicitly allow commands you know are safe and deny destructive ones (deletes, removes). Same speed, much less risk.
8. Use Chrome DevTools
Claude can open a browser, interact with your app, and verify functionality — buttons, forms, and flows. Great for front-end work.
9. Git Worktrees for Parallel Sessions
Two Claude sessions in the same folder overwrite each other. Use claude-worktree feature-name to create isolated workspaces on separate branches. Run three, four, or five sessions in parallel, then merge the branches.
10. Agent Teams
Sub-agents work in parallel but cannot talk to each other. Agent Teams can — they share a task list, communicate, and assign work between themselves. Costlier, but far more cohesive output for big projects.
Essential Resources
Official Documentation
- Claude Code Docs — full documentation with setup, workflows, and features
- Claude Code 101 — free beginner course on Anthropic Academy
Claude Code Courses
- Claude Code Beginners Full Course (4 hours) — Nick Saraev
- Claude Code Advanced Full Course (3 hours) — Nick Saraev
- Claude Code Full Tutorial for Beginners (35 min) — Tech With Tim
Videos
- What is Claude Code? — Anthropic
- How Claude Code Works — Anthropic
- Installing Claude Code — Anthropic
- Your First Prompt — Anthropic
- The Explore, Plan, Code, Commit Workflow — Anthropic
- Context Management — Anthropic
- Code Review — Anthropic
- 32 Claude Code Hacks in 16 Minutes — Nate Herk
- Introducing Claude Code — Anthropic
CLAUDE.md Examples
- Karpathy's CLAUDE.md — simple behavioral guidelines for AI coding
Skills
- Anthropic Official Skills Library — official reference patterns and ready-to-use skills
- Awesome Claude Skills — community examples for Claude-specific workflows
- Awesome Agent Skills — broader examples for reusable agent workflows
- Claude Superpowers — composable development skills for brainstorming, debugging, TDD, and more
- n8n skill — n8n workflow-building skillset for Claude Code
- UI UX Pro Max — design intelligence for professional UI/UX work
Integrations
- Context7 — up-to-date library documentation inside Claude Code
- Playwright MCP — browser automation and frontend verification
- n8n MCP — workflow automation management
- Claude mem plugin — memory across Claude Code sessions
- Codex for Claude Code — plugin bridge for Codex-style workflows
- Printing Press — generate agent-friendly CLIs and MCP servers from APIs
Community
Share what you build and ask questions right here in the Everything AI Discord!